kiosk mode (Windows assigned access)

What is kiosk mode (Windows assigned access)?
Kiosk mode is a feature in Windows operating system (OS) that allows a device to run only specified applications and settings. So, if a user such as an administrator wants the device to allow only one application to run, they can do so using kiosk mode.
Kiosk mode, identified as assigned access in later versions of Windows, today is a way to restrict a Windows 10 or Windows 11 system from running multiple programs. In a single-app kiosk, the user cannot do anything on the device outside of the kiosk app. The main purpose of running kiosk mode is to prevent users from accessing the system in unauthorized ways, such as modifying the device settings, switching to other applications or tabbing out of the kiosk application.
Admins commonly use kiosk mode to lock down a device and force it to run only one application or program, effectively turning it into a single-purpose device.
A common application of kiosk mode is to lock down a Windows device when it is being used in a public setting. For example, it can be used to lock down a point-of-sale (POS) application to prevent customers or bored employees from shifting out of the application and browsing other apps. It also prevents users from closing important tools or otherwise disrupting the intended use of the computer, such as recording sales, managing inventory, displaying presentations or generating invoices. Similarly, computers in a retail store can be configured to run in kiosk mode to provide customers access to a demonstration application while locking down all other applications.
Kiosk mode in older Windows operating systems
Kiosk mode is available in older Windows operating systems such as Windows XP, Windows Vista, Windows 7 and Windows 8. However, these OSes require changes to the Windows registry to invoke the kiosk mode. These changes can be made with registry editing tools like regedit.exe or regedt32.exe and include defining the application being enabled and any startup string. Registry changes require expertise on the part of the administrator setting up the kiosk computer, and improper registry edits can render the computer unbootable.
Starting with Windows 8.1, administrators can invoke kiosk mode by setting up Assigned Access when managing user accounts, which is considerably easier and less error-prone than making registry changes. In addition, under Windows 8.1, administrators can opt to have a system automatically log into assigned access mode so that kiosk mode will automatically restart if the system reboots. Other users can sign out of the assigned access mode by rebooting the computer and signing in with another (non-kiosk) account.
Assigned access can also be set to be disabled by rebooting the computer, through managing user accounts and opting not to use assigned access as a kiosk user account restriction. The computer will generally need to be restarted anytime changes are made to user account configurations.
Kiosk mode in Windows 10 and 11
Windows 10 and 11 systems also use the Assigned Access feature to set up a single-app kiosk and to run that app above the lock screen. The app launches automatically when the kiosk account (who may be the admin) signs in.
When setting up kiosk mode in Windows 10 or 11 systems, it's important to keep these considerations in mind:
- To enable the mode, user account control (UAC) must be enabled, if it is not already enabled by default. This feature protects the OS from unauthorized changes and generates notifications for any changes that require admin-level permission.
- Kiosk mode cannot be set up over remote desktop connections; physical sign-in to the kiosk system is required.
- Kiosk mode apps cannot use copy and paste.

How to set up kiosk mode in Windows 10 and 11
In Windows 10 and 11, a single-app kiosk can be configured in one of four ways:
- Locally within Windows Settings.
- Using Windows PowerShell cmdlets.
- Using the kiosk wizard in Windows Configuration Designer.
- Using a mobile device management (MDM) provider like Microsoft Intune.
All four options are available in Windows 10 Pro/Enterprise/Education editions and Windows 11 OS. For options three and four in Windows 10 Pro, version 1709 and above is required.
Setting up kiosk mode locally
In Windows 10 and 11 systems, a default setting enables automatic sign-in to the kiosk account after a restart. If this setting is already enabled and the user requires automatic sign-in to use kiosk mode, they don't need to make any changes to the settings.
To prevent automatic sign-in, the default setting must be changed as follows:
- Open the Settings app.
- Go to Accounts > Sign-in options.
- Set the "Use my sign-in info to automatically finish setting up the device after an update or restart setting" to Off.
After changing the setting, the user can apply the kiosk configuration to that device.
Setting up kiosk mode with PowerShell
Local standard admin users can use PowerShell cmdlets to set up assigned access and kiosk mode on more than one Windows device. They must run PowerShell as admin and use any of these cmdlets:
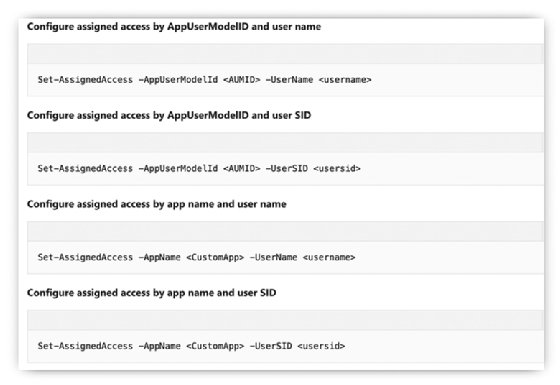
Set-AssignedAccess -AppUserModelId <AUMID> -UserName <username>
Set-AssignedAccess -AppUserModelId <AUMID> -UserSID <usersid>
Set-AssignedAccess -AppName <CustomApp> -UserName <username>
Set-AssignedAccess -AppName <CustomApp> -UserSID <usersid>
The following process must be followed before running the cmdlet:
- Sign in as admin and then sign in as the Assigned Access user account (create an account if it's not already created).
- Install the Universal Windows app.
- Sign out from the Assigned Access user account.
- Sign in again as admin.
Setting up kiosk mode with the kiosk wizard
Windows Configuration Designer (it must be installed first) provides a Provision kiosk devices wizard to configure kiosk mode. The kiosk can run either a Universal Windows app or a Windows desktop application.
To use the kiosk wizard, follow these steps:
- Select Provision kiosk devices in Windows Configuration Designer.
- Name the project.
- Select Next.
- Enable device setup.
- Configure the device name and devices for shared use.
- Enter product key.
- Set up the network and configure its settings (network SSID, network type).
- Enable account management and configure the settings for Active Directory and Azure Active Directory.
- Add applications.
- Add certificates for the kiosk device and configure certificate name and path.
- Configure the kiosk account and the kiosk mode app.
- Configure auto sign-in (yes or no).
- Configure kiosk common settings.
- Select Finish.
- Select Yes to password-protect the provisioning package.
Setting up kiosk mode with MDM
MDM services use an AssignedAccess configuration service provider to enable kiosk setup. This method requires the following steps:
- Go to the KioskModeApp setting in Assigned Access.
- Enter the user account name and the Application User Model ID for the app that will run in kiosk mode.
MDM providers also offer documentation with the steps required to set up kiosk mode. It's important to follow these steps to configure the mode properly using this method.
Learn 4 different methods for setting up kiosk mode in Windows 11. And see how to exit kiosk mode in any OS. Get started with kiosk mode in the enterprise: possibilities, benefits and challenges.