
Fotolia
How to build and use a bootable recovery partition in Windows 10
Understanding how to set up a bootable recovery partition in Windows 10 allows you to restore a damaged OS or troubleshoot a litany of problems.

Some operating system issues might require IT to rebuild or restore the OS, so knowing how to build and use a bootable recovery partition is vital.
In Windows deployments, the Installer builds a recovery partition on the Windows system/boot disk. The disk layouts vary over time, depending on which version of Windows was responsible for the first set of disk partitions, and which subsequent versions have come along.
Figure A and Figure B show a typical disk layout for a boot/system disk with a clean installation of Windows 10.


Figure A comes from Windows 10's built-in Disk Management utility, and Figure B comes from the MiniTool Partition Wizard. Both show a 500 GB nonvolatile memory express boot/system disk (C: drive). Both displays show the following partitions:
- A 450 MB NTFS recovery partition created by the Windows Installer. It's called Recovery in Disk Management and X:Recovery in the Partition Wizard.
- A 100 MB file allocation table 32 (FAT32) Extensible Firmware Interface (EFI) partition used during boot up by the computer's Unified EFI to identify hardware and get the PC running to hand control over to Windows 10.
- A 16 MB partition for boot files. (The Other format means it is not a well-known file system, such as NTFS or FAT32.) It handles the first phases of bootstrapping as the firmware loads and the EFI partition comes into play.
- A plus or minus 428 GB NTFS partition where Windows 10 resides as the C: drive.
- The unallocated space at the end of the drive in the example in Figure B resulted from its over-provisioning in Samsung Magician -- a tool for managing solid-state drives (SSD) -- which leaves just more than 10% of the C: drive's contents available for reclamation, should the drive ever need it. This is a common speed-up feature on modern SSDs.
How to set up a bootable recovery partition
Step 1: Identify your recovery partition. Open a PowerShell or command prompt window with administrative access. Type reagentc /info into the window and examine its output (Figure C).
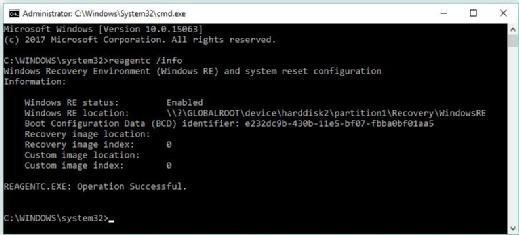
Most Windows installations show that the Windows Recovery Environment (WinRE) is active (the status is Enabled) and provide a location. The second line in Figure C shows that it appears as partition 1 on hard disk 2. The exact details differ depending on the machine on which you try this.
Step 2: Assign a drive letter. Before you can add the recovery partition to the boot menu, you must add it to the Windows file system, which requires assigning it a drive letter.
Open the Partition Wizard, then right-click on the 450 MB Recovery partition on the boot/system drive layout in whatever position the active WinRE partition appears on that drive. Start with number 1, and count from left to right to identify the partition that needs a drive letter. This particular item reads partition1, which means the partition furthest to the left needs the letter. Assign a drive letter to the recovery partition by clicking the OK button, and use whatever letter you'd like (Figure D).
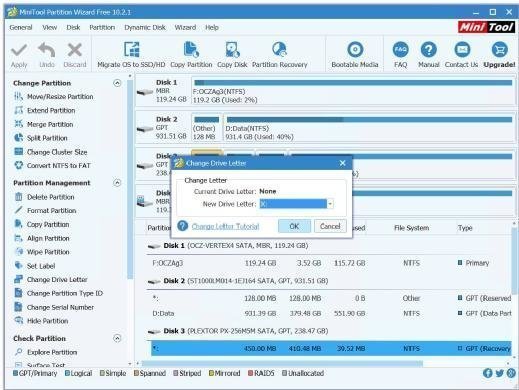
Once you click OK, you must then click Apply in the upper-left corner to commit the change.
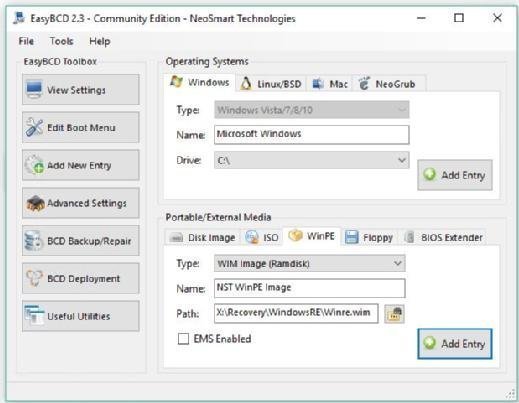
Step 3: Add a boot entry for the recovery partition in EasyBCD. Next, you should open EasyBCD -- a program you can use to alter Boot Configuration Data -- in which the View Settings button is selected by default. This displays the current entries in the Windows bootloader. For most readers, this consists of a single entry for your current Windows OS.
To add a second entry to the WinRE partition on the x: drive, click Add New Entry in the left sidebar. Then, click the tab in the pane in the lower section that reads WinPE. Enter <drive>:\Recovery\WindowsRE\WinRE.wim in the Path field, then click Add Entry in the lower-right corner of the EasyBCD window (Figure E).
You cannot navigate the file system on your bootable recovery partition inside EasyBCD or File Explorer. If the preceding string doesn't work, use the Partition Wizard and right-click Partition Recovery. Then, use the Explore Partition button to navigate through the file system instead.
The program eventually tells you it added a new item to the boot menu.
Step 4: Edit the boot menu entry text in EasyBCD. After the boot menu updates, click Edit Boot Menu on the left. The text that appears is NST WinPE Image (Figure F).
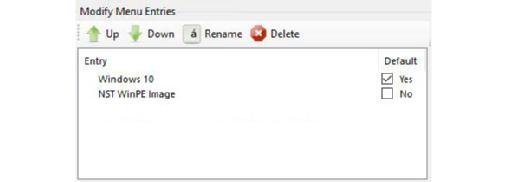
You can rename the image whatever you want. Click the line that reads NST WinPE Image, then click the Rename button. Type the name you want, and press Enter. Make sure you check the Use Metro bootloader box under Menu Options to see a modern-style graphical boot menu, instead of an old-fashioned, DOS-style character boot menu. Click the Save Settings button.
Step 5: Check your work. You must now restart the PC to see if the menu changes worked. You should see a Windows boot menu screen that reads Windows 10 above, and the name of your NST WinPE Image below.
If you choose the recovery option, the PC boots to a recovery image instead of the usual OS, and you can make all kinds of changes and repairs. When you're done, go back into the Partition Wizard and remove the drive letter from your bootable recovery partition.
This example assumes a simple and conventional drive layout. In the real world, PCs might be much more complex. If so, you can use the reagentc command to find the current recovery partition and add that partition to the boot menu.