Windows has a rich set of tools to fix nasty problems, such as being unable to boot or start, resolving driver conflicts, repairing Windows or restoring to a previous installation. Finding them and knowing which one to use are often hard to remember, however.
IT pros can access Windows 10 troubleshooting tools to do some basic repair operations when users' PCs have problems starting, running or crashing. The key to all of these Windows 10 troubleshooting tools is to get to the Advanced options screen, which contains a menu of advanced tools.
Advanced Boot Options uses a hierarchical set of graphical icons and menus, making it easy to traverse and much more descriptive and complete than in previous versions of Windows. Windows 10 has added options including booting to a command prompt, getting to the Unified Extensible Firmware Interface (UEFI) settings in the hardware, booting from an image and recovering a restore point.
Settings in the Advanced Boot Options menu
Getting to the Advanced Boot Options menu is simple if you can boot to Windows. The simplest method is to:
Close all applications.
Click the Power button in the Start Menu.
Hold the Shift key down, and click Restart.
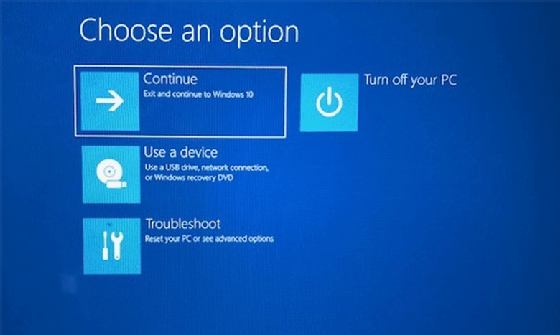
After performing these steps, on restart, Windows will display the Choose an option menu (Figure 1).
Figure 1. These are the initial boot options after restarting Windows.
This menu provides the option to boot from a device such as a USB stick, Windows recovery DVD or network connection.
Admins should note that, if the machine won't boot all the way to full Windows, you can often get to the Advanced Boot Options menu by hitting the F8 key at just the right time during boot. Laptops may require use of F11 to do this, and you may have to try several times to get it to work. The exact point that Windows starts is not easy to find, so when the machine starts booting, start hitting the F8 key.
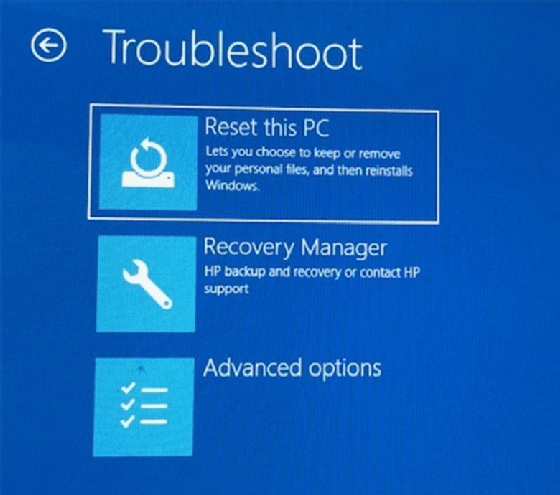
In the Troubleshooting menu, Reset this PC permits the reinstallation of Windows and enables the retention or destruction of personal files. This is a great option when Windows has significant startup, hanging or performance issues, and it does save the user's data.
Recovery Manager enables the PC's built-in backup and recovery capability -- in this case, HP's (Figure 2).
Figure 2. Troubleshooting options get more advanced.
Advanced options
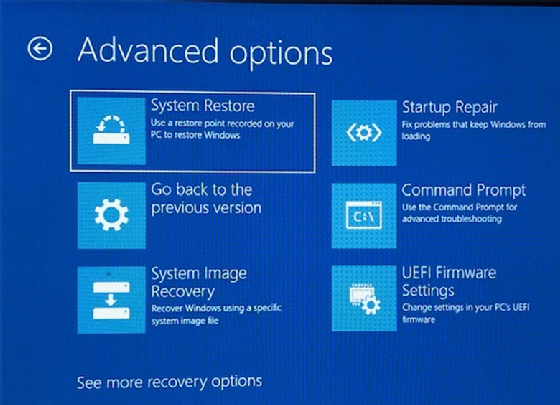
The Advanced options menu finally gets to the meat of the Windows 10 troubleshooting tools that admins will be familiar with.
System Restore. This option has been available for many versions of Windows and permits the restoration of Windows to a specific point, assuming the restore point has been created in Windows. If a software installation or driver update broke something, this option would enable restoration to a restore point created before the installation or update (Figure 3).
Figure 3. One option is to choose System Restore.
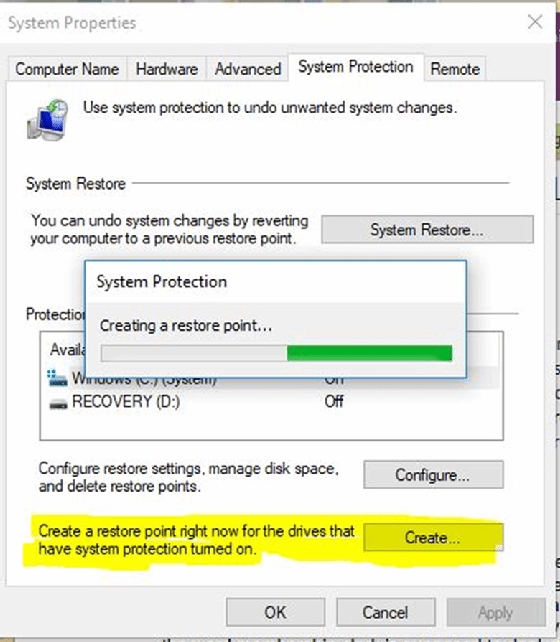
Once you choose this option, a System Properties window will appear (Figure 4). Select the Create… option, and on the ensuing dialog box, enter a logical name for the restore point, such as Initial Restore. Windows will add the time and date. Using the System Restore option, the system will restore to the configuration in this restore point at this point in time.
Figure 4. Choose the Create option to select your restore point.
System Image Recovery. Most organizations have a custom Windows image built for PC installation. This option on the Advanced options menu enables use of that image rather than the generic Windows recovery.
If you are a novice, get a lab PC, and do some playing with these options first.
Startup Repair. In cases of startup errors or failure, Startup Repair will perform a systematic check and attempt to repair the startup process. This option requires the use of an admin account, so be sure to set that up first.
Command Prompt. This option in the advanced Windows 10 troubleshooting tools gets you to a command prompt to manually manipulate files or run low-level commands.
UEFI Firmware Settings. This option dumps you to your PC's basic input/output system (BIOS) and enables you to manipulate UEFI firmware settings. You can also get to this option in the PC's BIOS settings on boot.
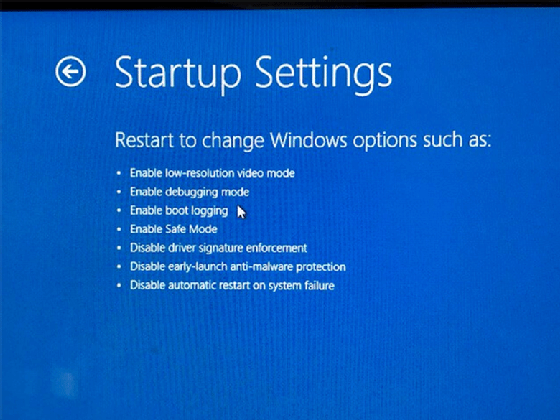
System startup settings
Advanced system startup settings, such as Safe Mode, are available but strangely hidden. In the Advanced options menu, select See more recovery options to reach these settings (Figure 5).
Figure 5. IT pros can access these startup settings.
If a PC is sluggish on boot, crashes, has performance issues or is logging errors that raise suspicions of a misbehaving driver, malware or other software, these Windows 10 troubleshooting options can help IT eliminate the variables.
Safe Mode performs a low-level boot, and if that's successful, then IT can add other services and applications or tweak registries on subsequent boots to find the problem. One of the key features of Safe Mode is to boot with or without the network installed, which IT can configure in System Configuration by entering MSCONFIG in the search bar.
Ultimately, the best way to manage Windows 10 troubleshooting tools is to have a good backup in the first place. If you are a novice, get a lab PC, and do some playing with these options first. It's also helpful to try getting to the Advanced options menu without going into Windows, which may vary on different PCs but saves a lot of headaches when a PC won't boot.