
ra2 studio - Fotolia
How to boot to Windows Safe Mode on Windows 10
Having problems with Windows crashes, applications or performance issues? Try booting to Windows Safe Mode on Windows 10 to pinpoint and troubleshoot the problem.

The Windows Advanced Boot Options menu provides access to tools that can not only diagnose, but recover a desktop from a host of boot and operational errors.
IT can use Safe Mode on Windows 10 desktops to eliminate software components one at a time to find and replace the problem software.
How Safe Mode works
Safe Mode enables IT admins to troubleshoot issues in Windows desktops through the process of elimination. The feature disables various drivers or software that could cause a boot failure, system crash, performance problems or misbehaving application, while still enabling key OS components and software to operate. With Safe Mode, IT can boot the Windows OS with only the software and drivers for the mouse, keyboard and display modes.
IT can use Safe Mode on Windows 10 desktops to manipulate drivers and software by reenabling them in the UI or Windows Registry to see which one is the problem. If IT applies a Windows application, device driver or associated update and the system misbehaves, IT can then boot Safe Mode to eliminate that driver or software. Then, IT can permit further troubleshooting to install a new, corrected version of the product.
IT can manually enable Safe Mode prior to or during a Windows boot. The Windows desktop or an application itself can trigger the mode as well.
How to boot Safe Mode on Windows 10
If the system is running, to boot to Safe Mode:
- Click on the Windows Start button and then the Power
- Hold the Shift key down, and click on Restart.
If the system fails during boot, to enable Safe Mode:
- Power the device off.
- Turn power back on.
- During startup, immediately hit the F8 key. This will trigger Windows to display the Advanced Startup Options menu.
![Windows Advanced Startup Options Screen]()
Figure 1. Windows Advanced Startup Options screen - Select Troubleshoot to see Advanced Options.
- At the bottom of Advanced Options, click on See more recovery options.
- Click on Startup Settings.
- Click on the Restart Windows will restart and display a new Startup Settings menu (Figure 2).

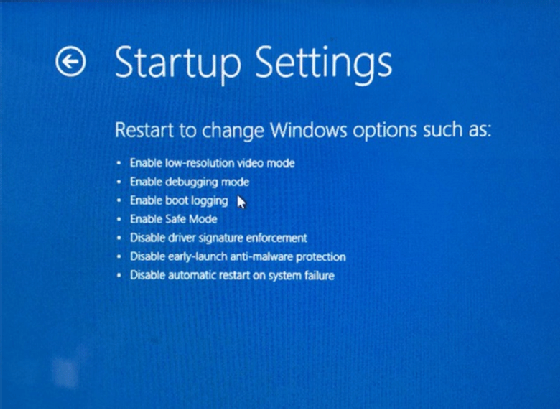
This menu offers three Safe Mode options:
- Enable Safe Mode: standard Safe Mode without networking and only essential Windows functionality.
- Enable Safe Mode with Networking: same as first option but networking is enabled.
- Enable Safe Mode with Command Prompt: Safe Mode that boots to a command line only.
The first option gives a minimal bare-bones boot. If Windows boots successfully and has basic functions, boot to the second option to add networking. If Windows crashes or displays a problem, then there is a problem with the networking components.
The third option is for experienced troubleshooters who can navigate with the command line and perform tasks such as modifying the registry or moving to the location of a known bad driver and replacing it.
When the system boots to Safe Mode, it disables all profile preferences, such as the wallpaper, and displays the words Safe Mode in the corners (Figure 3).

Registry Editor can enable and disable drivers and software for Windows and applications during the troubleshooting process. IT admins should only modify the registry if they've done so previously, or they could potentially render the system useless. From the Windows search bar, IT should type regedit, and the GUI will appear. To boot back to Normal mode, IT can reboot the device.
One issue with Safe Mode on Windows 10 is that IT must perform multiple boots to Safe Mode in the debugging process. It's a pain to have to boot to Advanced Options, find the Safe Mode option and continue booting each time.
There is a trick, however, that will force Windows to boot to Safe Mode on every boot until IT disables it. From the search function in the taskbar, IT should type msconfig to open the old System Configuration tool (Figure 4).
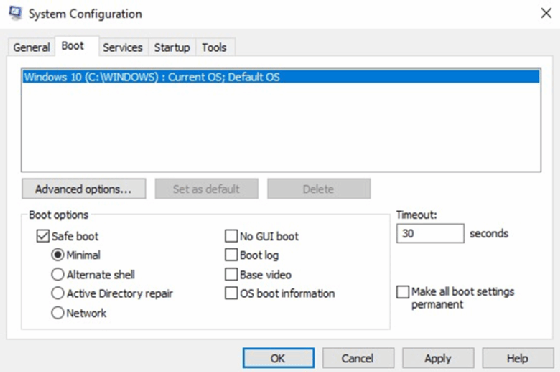
Then, IT pros should go to the Boot tab and select Safe Boot under Boot Options. There are other options to choose from, such as start up with or without networking or generate boot log. IT should click OK and choose to restart now or later on the subsequent dialog.
How to start applications in Safe Mode
Windows often enables Safe Mode automatically when the PC shuts down during a power outage or a crash. Outlook is sensitive to this type of shutdown. When the PC reboots and Outlook starts up, it advises the user that there may be a problem and asks the user if she wants to start Outlook in Safe Mode. This will disable add-ons and extensions and start Outlook in Safe Mode.
Unless there is an obvious problem with Outlook, however, the user can just start Outlook normally. When Outlook starts in Safe Mode, it's flagged with Safe Mode in the UI. Other Office applications will behave the same (Figure 5).

Other Microsoft Office apps, such as Microsoft Word, Outlook and Excel, can start in Safe Mode. In Windows 10, IT can go to the search bar and enter Run Excel.exe /safe, Run Outlook.exe /safe or Run Word.exe /safe to start the application in Safe Mode. IT can enable add-ons and extensions one by one to see which one is not working or causing a problem.
IT admins can enable or disable applications in the registry as well. Some third-party applications aren't able to start in Safe Mode, however, so IT should contact their vendors first.