Once you've created a custom Windows 10 image using Microsoft's System Preparation tool, you need to take a snapshot of that custom image and use the Deployment Image Servicing and Management command to create an installable ISO from that image.
But first, you should use Microsoft Hyper-V to create a checkpoint. To do so, boot the technician virtual machine (VM) from the same install media -- ISO in the case of a VM -- you used to install Windows on it. Be sure to boot from the ISO or install media. Do not let the VM boot from a virtual hard disk (VHD). If it does, restore the last checkpoint, then try again. For this process to work, it is essential to boot from a mounted ISO or installation media -- DVD, USB flash drive, etc.
Create a snapshot of your custom Windows 10 image
When Windows Setup shows the regional selections screen, press Shift + F10 to open the Recovery Console command prompt.
Type diskpart and hit Enter to start the Windows disk partitioning utility. Enter the command list volto list the available volumes, and then check the drive letters for Windows and image partitions. Notice that, in recovery mode, when you boot from installation media, partition ID letters are not the same as when you boot normally. In this example, please note that the Windows partition is currently D:, and the image partition is E:.
/imagefile:E\install.wim: E:\: the image drive where you save install.wim.
/capturedir:D\: D:\: the current drive ID for Windows drive.
/ScratchDir:E:\Scratch: E:\: Scratch is a temporary working folder you create on the image drive.
/Name:"AnyName": Anything you like.
Press Enter to run the command. This can take anywhere from five to 30 minutes depending on your host PC's hardware and available VM resources. For the first 15 minutes or so, you will see no progress indicator.
When DISM finishes, reset the technician VM and allow it to boot from its VHD. Your customized Windows 10 image is now set up. In a few minutes, you will arrive at the desktop. Sign in using your pre-established administrator account.
On the desktop, copy the newly created and captured install.wim file from the image drive to your host computer, then shut down the VM.
On the host PC, mount the original install media ISO you used to install Windows onto the technician VM. Create a folder called ISO_Files. Copy all the content from your mounted Windows ISO file to the ISO_Files folder.
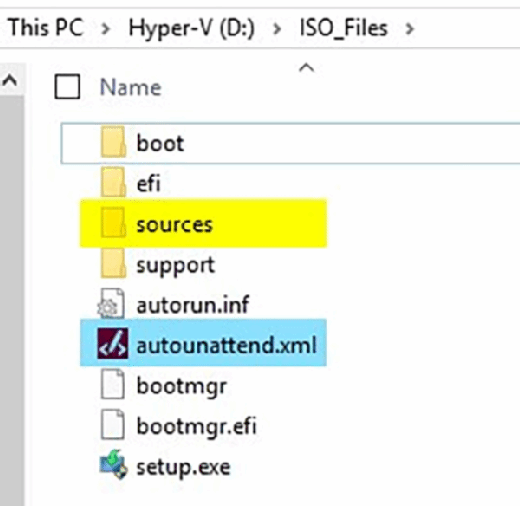
When that's done, replace the original install.wim file in the ISO_Files\Sources folder with your custom install.wim file. Also, copy the autounattend.xml file you already created to the root ISO_Files folder.
Figure A shows the ISO_Files folder when everything is done. This example replaces the original install.wim file in the Sources folder with the custom one and places autounattend.xml in the root of this folder:
The ISO folder
Open an elevated Deployment and Imaging Tools Environment from Start > W > Windows Kits. Remember, you installed this when you installed the Windows Assessment and Deployment Kit.
Change your working folder to the root of the C: drive using the CD\command.
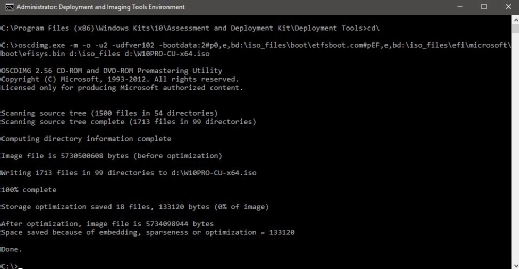
Enter the following command to write the ISO folder:
Figure B shows how it looks when you enter the command inside the Deployment and Imaging Tools Environment. The last part of the command string contains the path and name of your ISO. You may name and save this any way you like.
The Deployment and Imaging Tools Environment
In this example, the ISO is named W10PRO-CU-x64.iso and saved to the root of the D: drive.
You now have a unique custom Windows 10 image, personal Windows 10 install media with preset user accounts and preinstalled software.
This only takes a minute or two. When it's done, you may use this ISO to perform a totally automated installation on any VM, or to burn it to a DVD or USB flash drive to install it on any physical PC. Depending on the size of your custom Windows 10 image, you probably cannot burn your ISO to a single-layer DVD.
You now have a unique custom Windows 10 image, personal Windows 10 install media with preset user accounts and preinstalled software. You can use these to perform an automated Windows 10 installation. Simply boot any PC from your install media and you'll have an installed Windows 10 instance ready to use.