How to enable Hyper-V on Windows 10 for a lab environment
While there are several ways to test new updates on virtual machines, Hyper-V enables desktop administrators to add multiple VMs to a single desktop and run tests.
IT staff often need to replicate user problems or new software updates in a lab setting to identify potential issues.
In the past, this required a significant amount of hardware that supported various environments and an isolated computing system to test and evaluate software. Typically, the lab environment would use hand-me-down hardware because there often wasn't a budget for testing hardware.
IT professionals can now use virtualization technologies to set up a lab environment, but you must know how to enable Hyper-V on Windows 10.
Hyper-V is a free and powerful tool that can make a lot of IT tasks easier without a significant hardware investment, but it does take some skill and knowledge to enable and properly use Hyper-V on Windows 10.
VMs as testing labs
With VMs, IT professionals can install multiple desktops on a single computer and test issues with various OSes and applications. For example, IT staff can test how an application works on both Windows 7 and Windows 10.
A single PC can run a VM configured with Windows 7 and legacy applications to test Windows and antivirus updates for compatibility. The same PC can run another VM with Windows 10 and current line-of-business applications to test the Windows and AV updates in that environment. IT professionals should run these tests prior to a corporate rollout of any updates or new software.
These VMs require resources, so IT professionals must consider this at installation. VMs require memory, CPUs, hard disk, USB ports, peripheral devices, CD drives and any other hardware peripheral the physical device can access. IT professionals must allocate a portion of the physical memory and CPU to the VM, but it will only be consumed when the VM is in use.
The resources exist in a single file called a virtual hard disk, which always occupies storage on the physical disk. Thus, admins could create multiple VMs if there is enough hard disk storage. When a VM is running, it will deplete physical CPU and memory.
Hyper-V is only available in the Enterprise, Pro and Education editions of Windows 10.
An organization's VMs will compete with the host OS for resources. For example, a laptop with two CPU cores -- 4 logical processors -- and 8 GB RAM running a single VM with 2 GB RAM would leave only 6 GB RAM for the host OS. This will cause a significant performance degradation in the host.
Note: When selecting hardware to run Hyper-V, consider upgrading RAM, CPU and hard disk capacity to run the desired VMs. Admins can even obtain a server-class computer to run an entire virtual computing environment.
How to install Hyper-V in Windows 10
Windows 10 includes Hyper-V as an optional feature, so it is not available for download. Hyper-V is only available in the Enterprise, Pro and Education editions of Windows 10. It is only supported with 64-bit processors with Second Level Address Translation and the CPU must support VM Monitor Mode Extension -- Intel Virtualization Technology for Connectivity on Intel CPUs. Most modern 64-bit hardware supports all of these functions.
Prior to installing Hyper-V, desktop administrators should determine the amount of CPU, RAM, hard disk space and other resources the VMs will need and ensure the host machine has sufficient resources to function.
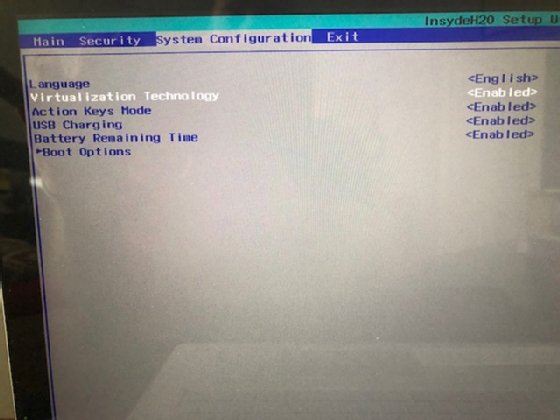
It is important to note that before IT can enable Hyper-V on Windows 10, it must enable the virtualization option in the BIOS of the host machine. To accomplish this, IT professionals must boot to the BIOS menu and enable virtualization. For example, IT pros could enable virtualization on an HP Envy laptop ( Figure 1).
A desktop with the virtualization technology enabled, which will allow IT to run Hyper-V.
To install and enable Hyper-V in Windows 10, IT professionals must do the following.
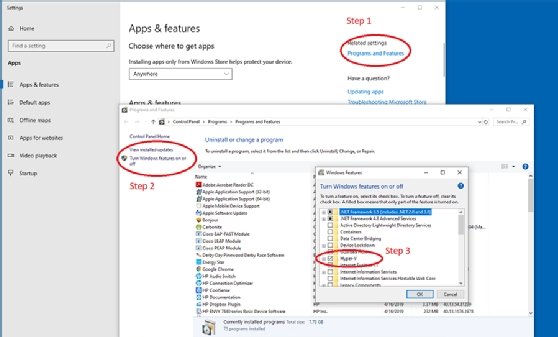
Go to the Windows button and right click 'Apps and Features.'
In the 'Apps and Features' window, go to the upper right-hand corner of the screen and select 'Programs and Features.'
In 'Programs and Features,' select 'Turn Windows Features On or Off' on the left side.
In the ensuing dialog, check the Hyper-V entry and click OK (Figure 2).
Reboot the computer.
The steps to enable Hyper-V on Windows 10 without using PowerShell.
IT can also install Hyper-V using PowerShell with the following script: Enable-WindowsOptionalFeature -Online -FeatureName Microsoft-Hyper-V -All
Using Hyper-V for desktop testing
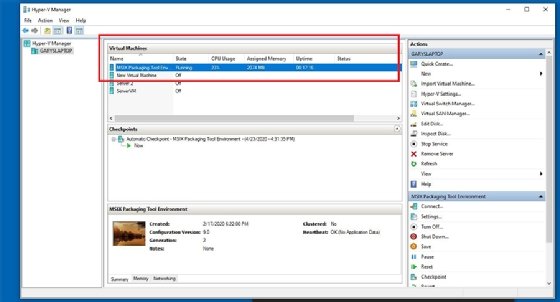
After reboot and login, desktop admins can start the Hyper-V manager. From the Windows menu, IT pros can navigate to Windows Administrative Tools within the Hyper-V Manager. Once Hyper-V Manager is open, IT should right click on the Hyper-V entry and add Hyper-V manager to the start menu or task bar as desired (Figure 3).
IT's view of an active VM through the Hyper-V manager.
In this example, the Hyper-V Manager shows several VMs that have been installed and configured by the administrator. There are no default VMs built in. Note that the first VM in the list is running and shows the resources being consumed by the VM. The VM will appear on the display of the host machine. Having two computers on one display may take a little getting used to (Figure 4).
A VM running on a Windows 10 desktop in a second Window.
IT professionals should secure the required images or ISO files to install the OS on the VMs. These must have proper licensing and authorization. Most organizations have standard images for employees that include sets of applications based on users' needs.
Editor's Note: Part two of this article series will dig deeper in the creation, use and management of VMs in Hyper-V on Windows 10.