Learn native Windows 10 virtual memory management methods
With the variety of local techniques for managing Windows 10 virtual memory, desktop administrators can address numerous performance issues on end-user machines.
IT administrators can address 'out of memory' errors and poor performance complaints without buying more memory, but it takes a deep knowledge of Windows 10 virtual memory management techniques.
IT pros must have a strong understanding of how memory and virtual memory are structured and used in Windows. They must know if buying more RAM will solve the problem or if the issues go deeper than that.
Troubleshooting Windows 10 memory issues
The first step in troubleshooting any desktop issue is to know the details of the computer. This includes which version of Windows is installed, the number of CPUs and how much memory there is. The MSINFO30.exe command provides this information.
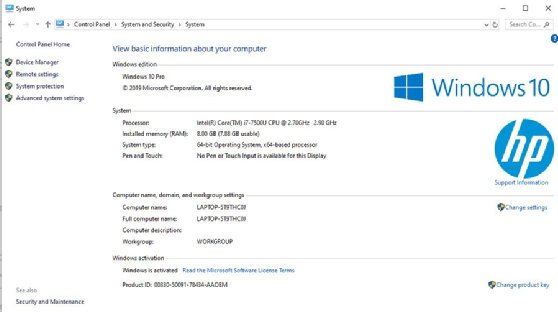
MSINFO32.exe still works in Windows 10, but admins can obtain the same information by entering system information in the Windows Search bar. This provides an easy-to-read report with the following significant details (Figure 1).
System summary
OS name: not only Windows 10 but the licensing information -- in this case, Pro;
Version: the build number, which is handy to see if admins have applied certain updates;
System: the computer's name, manufacturer and model;
System type: x64 or x32;
Processor type: number of cores and logical processors;
Location of Windows directory: the drive or directory name, which is handy for a non-standard installation;
Location of system directory: system32 -- for drivers and so on;
Installed and available physical memory: measured in total memory minus amount of memory used;
Total virtual memory;
Available virtual memory; and
Location of page file.
The system summary also includes the following categories that are crucial to understanding the best Windows 10 virtual memory management methods for the current issue.
Figure 1. The Windows 10 system information displays relevant data for virtual memory management.
Hardware resources
This includes in-depth info about hardware, including memory and BIOS.
Components
This section displays information about devices such as CD-ROMs, sound, display and network devices. It also shows a complete list of all disk drives the system detects, the size and free space of these drives, volume name and the file system installed.
Software environment
This shows any software interacting with the desktop, including services, drivers, print jobs and current tasks.
While this other information is helpful in some situations, the most important information for Windows 10 virtual memory management is the system summary.
Windows 10 virtual memory management options for 'out of memory'
There are several preventative measures IT professionals can take to avoid 'out of memory' errors. It is important to note that 'low virtual memory' errors can occur even when the desktop has enough RAM. Remember, virtual memory is the storage in the pagefile.sys file on the hard disk that applications use as memory, and the OS architecture must address both physical and virtual memory.
This is most common with 32-bit Windows because of its limited ability to address more than 4 GB of RAM: 2 GB address space for user mode -- applications and processes -- and 2 GB for System mode -- the OS.
Unless there is a compelling reason to tweak the page file, leave it alone.
In 64-bit Windows, user-mode processes get 8 TB, while System mode gets part of 256 TB address space. Thus, 64-bit architecture enables more application data to exist directly in RAM because it can address more memory directly without storing any in virtual memory. This increases performance dramatically and will significantly reduce or even eliminate low-memory errors. This may be an easy fix depending on what the admin has configured the hardware and OS for. Desktop admins should run MSINFO32.exe or system information to determine the following.
If the hardware, or System Type, is 32-bit: In this scenario, Windows must be 32-bit. The only way to fix this is with a new 64-bit computer and to load 64-bit Windows.
If the hardware is 64-bit and the OS is 32-bit: In this case, the OS is not taking advantage of the 64-bit memory structure. Fix this with a clean install of Windows 10 64-bit; an upgrade is not possible.
The amount of physical memory reported in the example confirms the amount of memory in this system is 8 GB (Figure 1). While 8 GB is sufficient for most user applications, special applications such as gaming, photo and video editing, and database applications such as SQL could benefit from at least 16 GB RAM.
If the device is running a memory-intensive application and error messages indicate it is out of memory, there are a couple of Windows 10 virtual memory management options. If these errors are common, it is best to get more RAM. If it is unusual to get these errors, consider tweaking the page file, especially for 32-bit systems. By default, Windows 10 manages the page file automatically but IT admins can modify this.
Microsoft's recommendation is that the initial page file should be 1.5 times the amount of physical RAM and no more than 3x for the maximum. While admins can also opt to run the Windows 10 desktop with no page file, this is not recommended because the page file also dumps memory content during a system crash. If there is no page file or if it is too small, there may not be enough data to troubleshoot the problem.
Figure 2. The Windows Task Manager tab denotes the page file size.
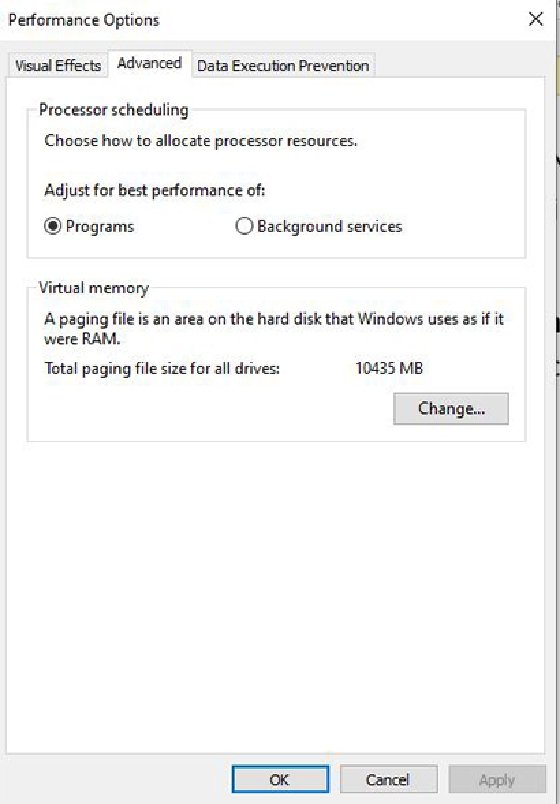
To modify the page file size, go to Control Panel – System and Security – System – Advanced System Settings – Advanced (tab) (see Figure 2). Click the Settings button under Performance and then click the Advanced tab. Under the virtual memory section, notice the current paging file size (see Figure 3). The page file in this example is 10 GB for a system with 8 GB RAM. Click the Change button.
Figure 3. The total virtual memory for all drives in Windows 10.
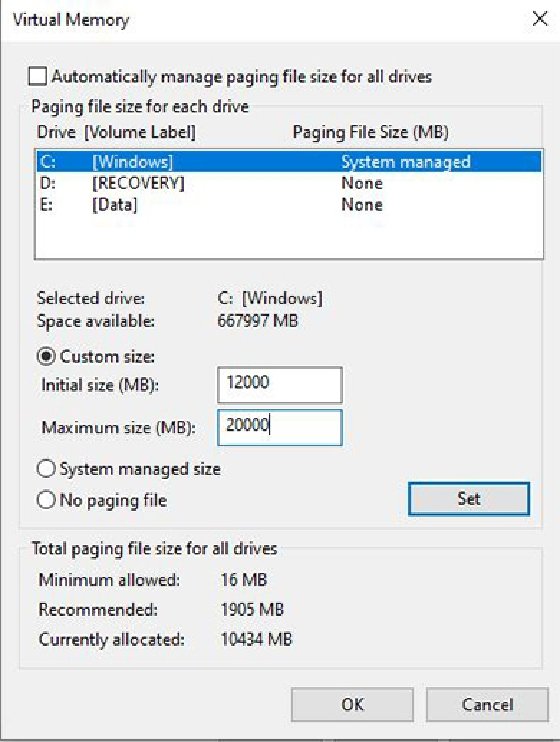
In the Virtual Memory dialog, uncheck the 'Automatically manage the page file size for all drives' box (see Figure 4). The physical drives available for the page file will display. Caution: The page file takes up disk space. Make sure there is enough disk space before increasing the page file.
The dialog here shows available disks and space. In this case, the desktop admin can only use the C-drive. The page file can span across multiple physical disks, but this doesn't work for disk partitions. Then select the Custom Size option. The system allocated 10,435 MB or approximately 10 GB.
Figure 4. How to set the page file to a custom size in Windows 10.
The admin should increase this to the 12 GB Microsoft recommends and raise the maximum to 20 GB, keeping it below the maximum recommended limit of 24 GB. Click Set and reboot. Remember, this will take up disk space.
Final recommendation for desktop admins
Unless there is a compelling reason to tweak the page file, leave it alone. Windows uses a good bit of logic and known recommendations to tweak the page file memory defaults based on the system's parameters. Some users report increased performance when reducing the page file for 64-bit systems because there is not much need for it. A benchmark that desktop admins can use is a 1.25 GB page file for 8 GB RAM, 2.5 GB on 16 GB systems and a 5 GB page file on 32 GB systems.
Another way to improve page file performance is to put the page file on a non-system drive. In other words, install the page file on a drive that Windows 10 is not installed on. Switching to a solid-state drive (SSD) from a standard hard disk drive (HDD) will likely provide a noticeable performance increase not only for the page file but for boot up and application access. An SSD is essentially a disk made of RAM with no mechanical parts like the HDD.
Windows 10 compressed memory
Windows 10 has introduced a new feature called compressed memory. Like a compressed file, this feature compresses memory, which increases available memory for the Windows 10 desktop. When the OS fetches data from that compressed memory, the OS decompresses it for use.
While this involves some overhead memory use, it is still much faster than paging data to and from the page file on a hard disk. If there is plenty of RAM to handle applications, the OS won't use memory compression. Compressed memory is enabled by default, but desktop admins can disable and enable it by executing a PowerShell command. Type PowerShell in the Windows Search box to open PowerShell window then execute the following command:
>Enable -MMAgent -mc
>Disable -MMAgent -mc
There is a way to perform this task via the registry editor -- Regedit or Regedit32 -- but editing the registry is very high risk, so that method is not recommended.