Navigating the Registry Editor for Windows 10 desktop admins
The Windows 10 registry stores some critical desktop settings that IT pros should know how to edit, alter or even delete to provide end users the optimal desktop experience.
Like its predecessors, Windows 10 includes a registry database for maintaining OS and application configuration settings.
Although the registry is designed to work in the background, without requiring user interaction, an administrator might need to update the registry on a user's desktop to change the settings associated with the OS or an application. For example, an administrator might want to remove settings left behind after an application was uninstalled or disable a built-in Windows features such as the Action Center.
To access and update the registry on a desktop, IT professionals can use the Registry Editor for Windows 10 -- regedit.exe -- which is a built-in tool for navigating the registry's hierarchy and modifying its keys and values.
What is the Windows registry?
The registry stores the settings data hierarchically and groups all related settings into hives, or categories, that represent the top level of the hierarchy. The settings themselves are stored within the hives as keys and values, and each key can contain multiple subkeys and values.
Windows desktops store their most critical configuration settings in the registry, many of which are not accessible through the desktop's interface. The registry includes settings for both hardware and software, and for the system's user accounts.
Windows 10 loads the registry hives into memory during the startup and login processes. Settings within the hives can then be accessed from memory whenever the user launches a Windows feature or application. The registry can also include settings for third-party applications, but it's up to the vendor to determine which settings should be stored there.
Administrators who need to update the registry on a user desktop should proceed with caution. An incorrect change could cause the OS to become unstable or even unbootable. IT admins must also remember to create proper backups and system restore points before they make these changes.
Getting started with the Windows Registry Editor
IT professionals have several methods they can use to launch the Registry Editor for Windows 10, but the easiest is to start it from the Windows search box.
To launch the Registry Editor, IT pros should type regedit into the Windows search box, then click the Run as administrator link. If prompted to allow the application to make changes, they should click Yes. When the Registry Editor appears, desktop admins can search through the key hierarchy and update any required settings.
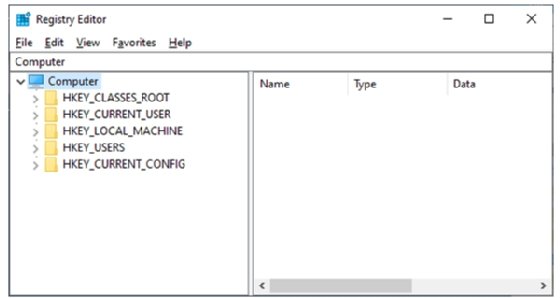
The Registry Editor has five main hives that store the specific keys and values, which display in the left pane (Figure 1).
The Windows Registry Editor's five hives of settings
To access individual settings, IT pros should click the arrow to the left of the hive's folder icon. A hive is essentially a top-level key that contains its own set of related keys, which in turn can contain additional subkeys. By default, the Registry Editor for Windows 10 includes the following five hives:
The HKEY_CLASSES_ROOT (HKCR) hive contains settings that determine how files are associated with Windows applications.
The HKEY_CURRENT_USER (HKCU) hive contains settings specific to the currently logged in user. The keys in this hive are linked to the related user folder in the HKEY_USERS hive.
The HKEY_LOCAL_MACHINE (HKLM) hive contains hardware and software settings specific to the local computer.
The HKEY_USERS (HKU) hive contains settings specific to the user accounts on the local computer.
The HKEY_CURRENT_CONFIG (HKCC) hive contains settings related to the hardware profile on the local computer, as it differs from the standard configuration.
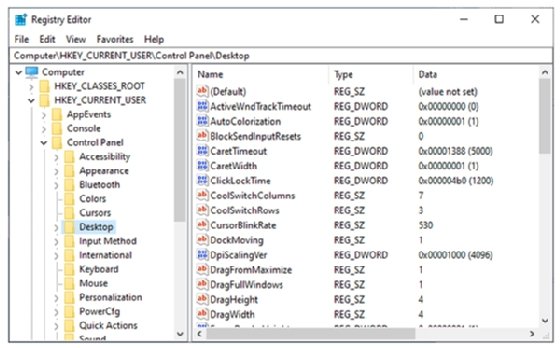
All keys and subkeys are listed beneath the hives in the left pane. When IT pros select a key, the values associated with that key are shown in the right pane. For example, when Windows admins select the HKCU hive, the Control Panel key will expand and they can view the Desktop subkey selected and the associated values in the right pane (Figure 2).
The desktop subkey values and the associated name, type and data of each value
IT professionals should keep in mind that each value has three parts: name, type and data, but the data field is populated by a value, so it has the potential to confuse admins.
Updating the registry
The address bar, which lives just below the menus in the Registry Editor, includes the path to a selected subkey. IT can use the address bar to go directly to a key by typing the path into the address bar and pressing enter. The Registry Editor for Windows 10 also includes a Find feature for searching the registry, which IT pros can access through the Edit menu. Both of these approaches make it much easier to locate a specific key because they don't require the admin to navigate through the hierarchy manually, which can be a tedious and cumbersome process.
To update a setting, a Windows 10 admin only needs to double-click the desired setting in the right pane and change the value in the Value data text box. For example, the Desktop subkey includes the PaintDesktopVersion setting, which controls whether the information about the OS version is displayed on the desktop home screen. By default, the value is set to 0, which means the information is not displayed, but if a desktop admin changes the value to 1, the information will be displayed (Figure 3).
The PaintDesktopVersion setting enabled in the Registry Editor
IT pros can also add and delete subkeys or their associated settings if they right-click an item and select the appropriate option from the context menu. For example, to add a subkey to Desktop, a desktop admin should simply right-click the key, point to New, and then click Key.
Before making any changes, IT pros should back up the entire registry or the individual keys they'll be modifying.
Before making any changes, IT pros should back up the entire registry or the individual keys they'll be modifying. The Registry Editor for Windows 10 makes it relatively simple to create registry backup files, which are just text files with the .reg extension. Desktop admins can access this feature through the Export option on the File menu or by right-clicking a key and selecting Export from the context menu.
When IT is working with the HKCU hive, it should keep in mind that the settings apply only to the current user. If an IT pro is logged into a desktop as an administrator and wants to update settings for the computer's regular user, he or she will need to load the hive associated with that user account into the Registry Editor.
To load a user's settings, IT pros should select the HKU hive in Registry Editor's left pane, click Load Hive on the File menu, and open the user's NTUSER.DAT file, which is typically located in the C:\Users\<user_name>\ folder.
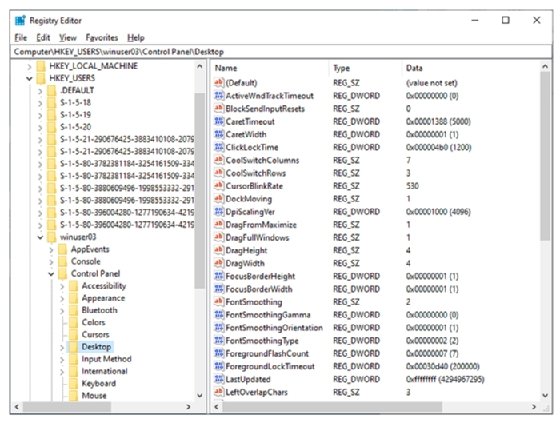
To complete the loading process, IT pros must then provide a name for the folder, which it will display in the Registry Editor. For example, IT can view the hive settings loaded for the 'winuser03' account with the selected Desktop subkey (Figure 4).
Desktop settings for the specific user, 'winuser03'
After an IT pro loads the hive, he or she can update the settings for that user and then unload the hive. The updates will then be applied to the user's account once that user logs on to the local desktop.